BYOD Transition to
Windows 11 Managed Devices
The following guide will step you through how to enrol an existing, non-managed, Windows 11 device into the Managed BYOD platform.
If you have any issues while working through the set-up guidance below, then you can raise a request for support below.
IMPORTANT: Only follow this guide if your device is currently not set up for Managed BYOD and you are moving over to your schools Managed BYOD.
If you have a device with Windows 11 Home, please follow all steps in this guide to upgrade your device to Windows Education and complete the Managed BYOD setup.
If you have a non-managed device that is already running Windows Education or Windows Professional, with an administrator account, you may start at Step 27.
If you are unsure which version of Windows you have, please check the documentation that came with your device or confirm with your place of purchase, if necessary, before proceeding.
Before you begin, please ensure you have the following:
- Your device with Windows 11.
- A stable internet connection.
- Fully charged device and connection to power.
- A personal Microsoft Account for the device with password and administrator access.
- Student’s school email address (firstname.lastname@mnstu.catholic.edu.au).
- Student’s school Password.
Transitioning a Windows 11 Device – Not Managed to Managed
Follow the steps below to transition your Windows 11 non-managed device to the Managed BYOD platform.
You can also download a copy of the instructions here.
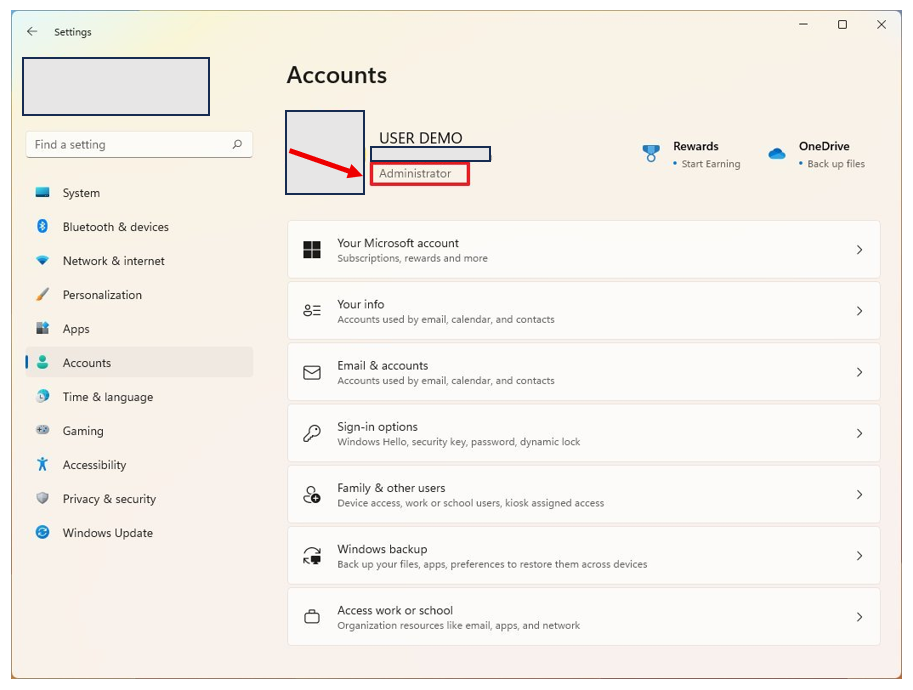
- After logging in to the device check to make sure that the account you are using has administrator permissions. Click on Windows ‘Start’, select ‘Settings’ then select ‘Accounts’.
You will see the current user account at the top which should show ‘Administrator’ underneath as shown in the image below. If this area is blank the user account does not have administrator privileges.
IMPORTANT: You must have Administrator permissions to complete the following Managed BYOD process.
If the account that is currently signed in is not an administrator than another account on the device will be an administrator, usually a parent account used to set up the device.
Sign out and sign back in with the administrator account.
- If the administrator account you are using does not have any Microsoft Family Safety Settings active you can move straight to step 12. If the account that is signed in is a child account you will now need to adjust the content filters in your Microsoft Family Safety settings for the child account. Open the following link for the Microsoft Family Safety Page in a web browser, not through the app. (The app only provides minimal options to change access to content).
- On the landing page find the sign in button and click ‘Sign in’.
(Note that the image below may be different to what you see)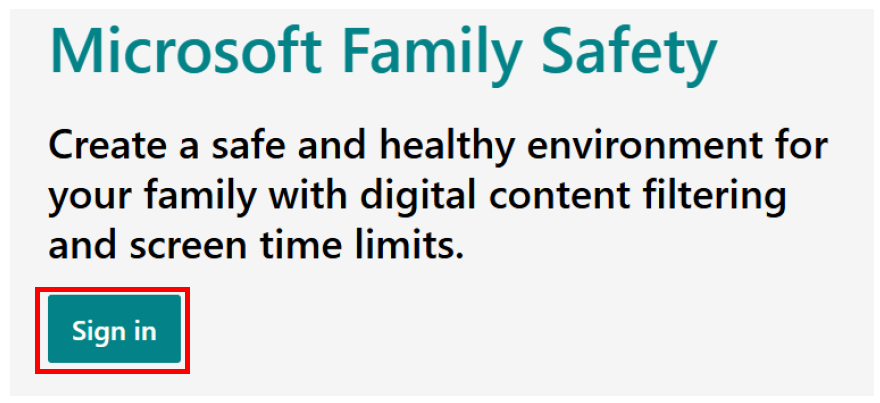
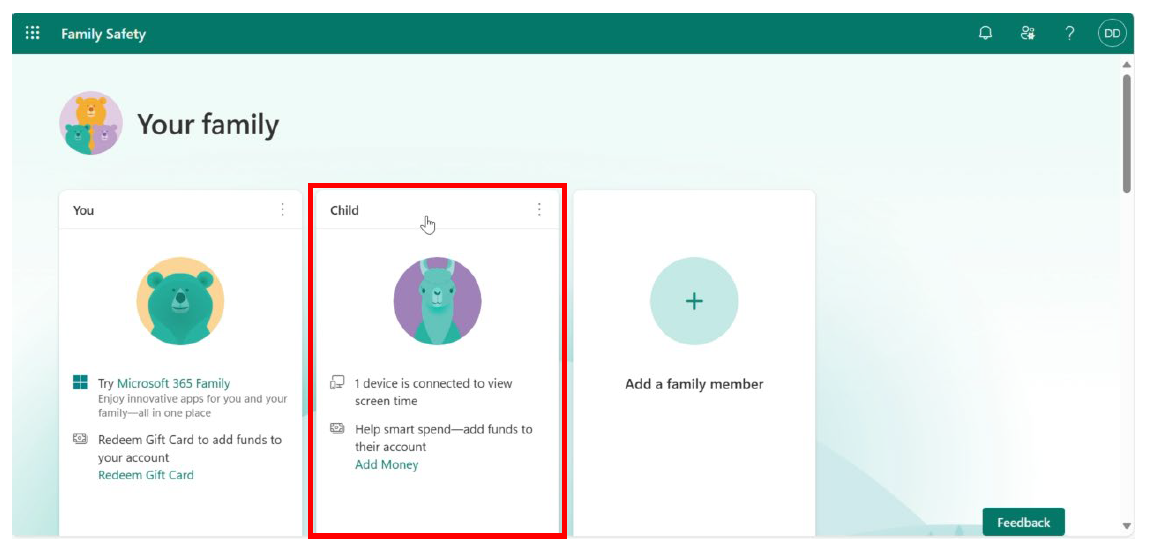
- You should now see a screen similar to the one below showing the student (Child) account and the Family Organiser (Dad in this example) listed.
If the family organiser is not the one signed in click on the ‘account manager icon’ in the top right corner then select ‘Sign in with a different account’ to allow the family organiser to sign in.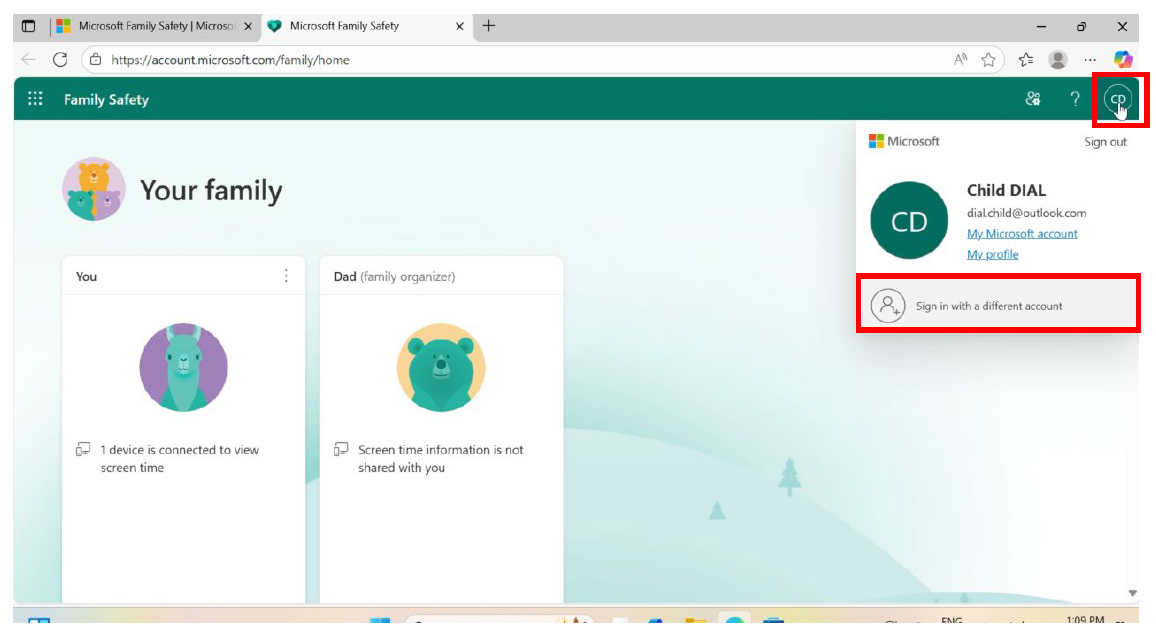
- A Microsoft pop up window will appear like the one below. Enter your parent Microsoft account information for the “family organiser” and click ‘Next’.
Note: This will be the adult account in charge of managing your Microsoft Family settings shown in the previous screen.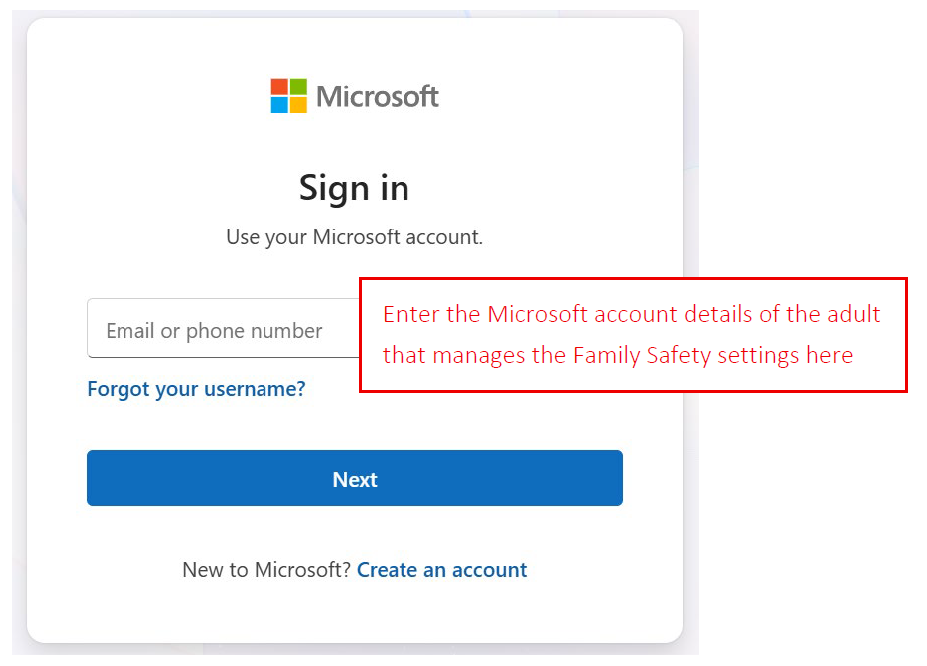
- Once signed in as the family organiser, select the child’s name in family members list.
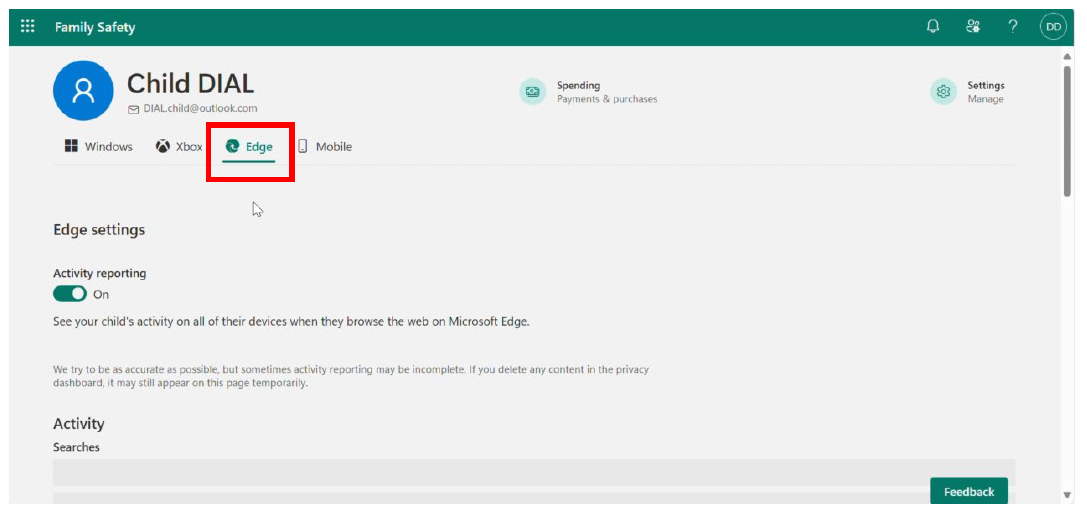
- Select the ‘EDGE’ tab from the platform options at the top of the page, under the family members name and email address.
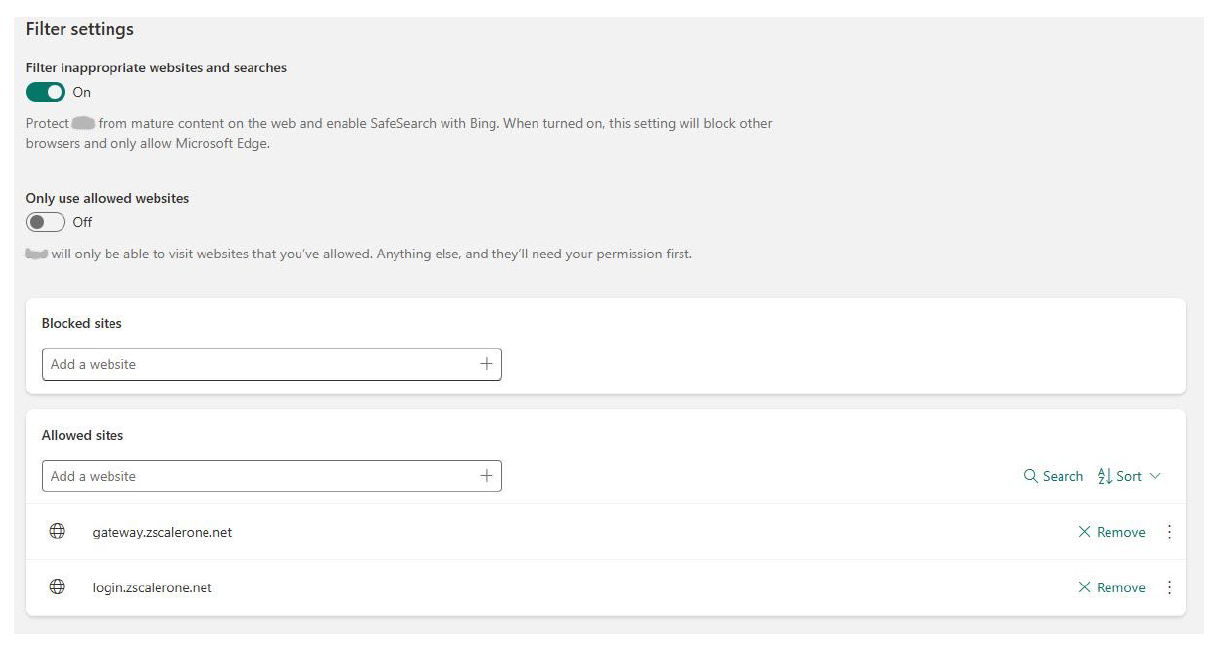
- Scroll down the page until you see the ‘Filter settings’. Turn ON ‘Filter inappropriate websites and searches’.
Turn OFF ‘Only use allowed websites’.
- Underneath you will see the ‘Blocked sites’ area.
Ensure there are no sites listed in the block sites that might be needed for school, such as gateway zScaler.
Clear the blocked sites list by clicking on ‘Remove’ next to any sites in the blocked list.
Note that the ‘filter inappropriate websites and searches’ will still be operational and you can add any sites you wish to block, that are not necessary for school, to this list at any time in the future.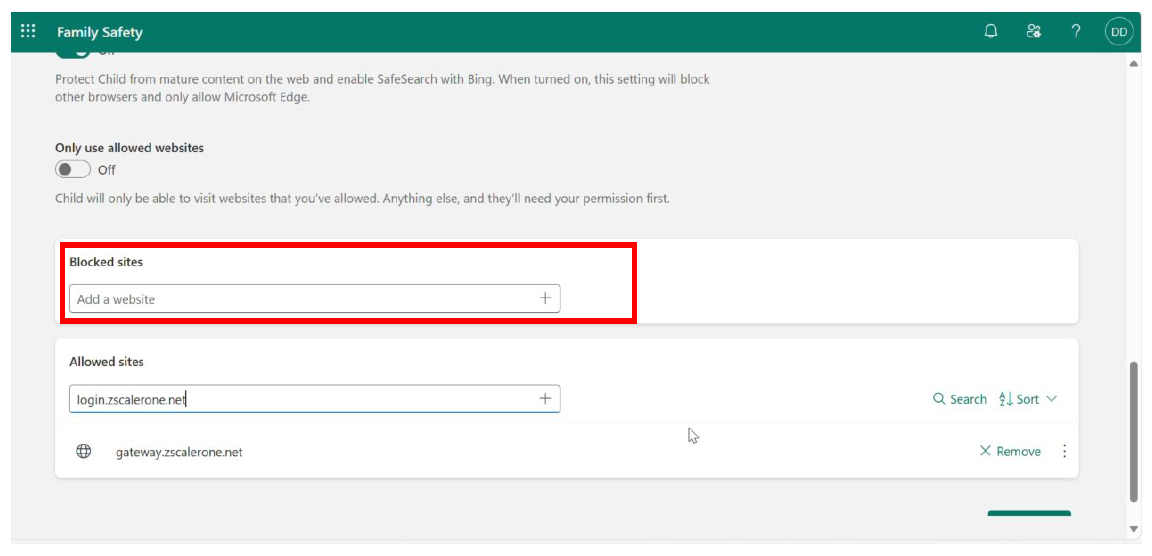
- Next look at the ‘Allowed sites’ area.
Add the following sites to the ‘Allowed sites’ list by typing or copying them in to the ‘Add a website field’ and pressing the + icon.
Ensure these sites are added:
gateway.zscalerone.net
login.zscalerone.net
These two websites are what students are directed to when they need to authenticate on our network to access websites online, beyond our intranet.
- When setting changes are completed correctly it should look like the screenshot below.
We can now Upgrade the device to Windows 11 Education and the Managed BYOD enrolment for school.
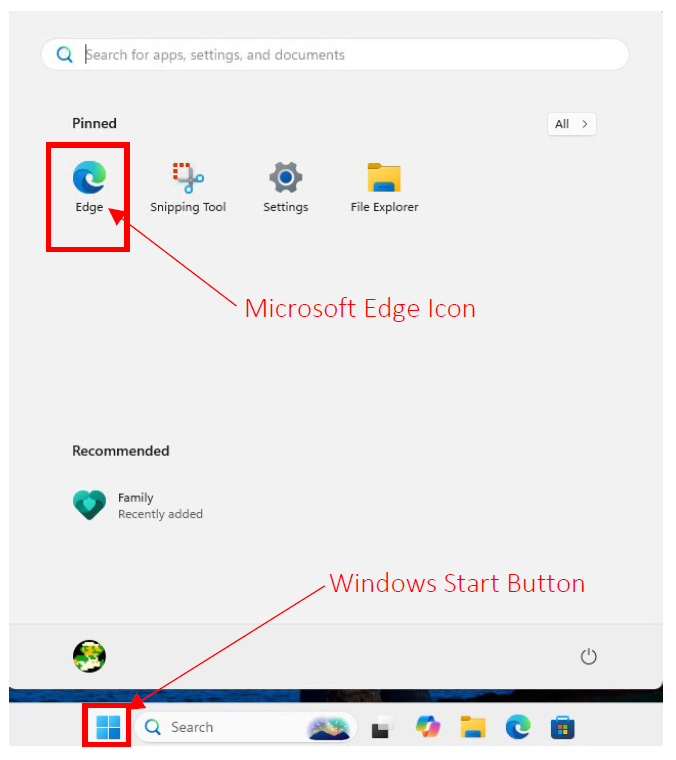
Note: The user that is logged in for this process must have administrator permission for the computer as outlined in Step 1. - Open a web browser (such as Microsoft Edge or Google Chrome) and navigate to the ‘MNConnect’ page at https://mncatholic.sharepoint.com/sites/MNSchools. This will normally be available, on the start menu of the device, and visible when you click the start button.
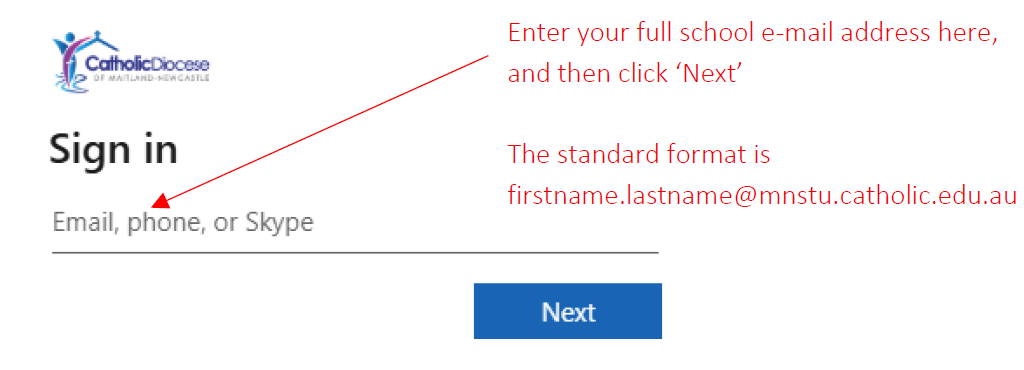
- Once the browser opens and you have navigated to https://mncatholic.sharepoint.com/sites/MNSchools you will be prompted to enter your school login details.
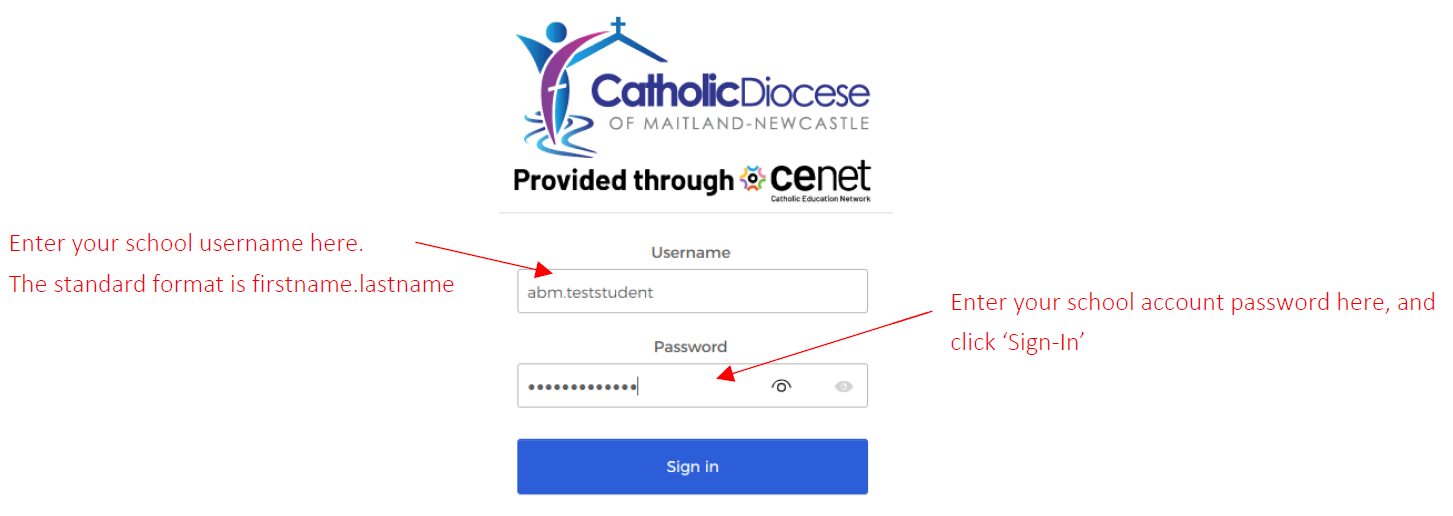
- When prompted enter your school username and school password then click ‘Sign in’.
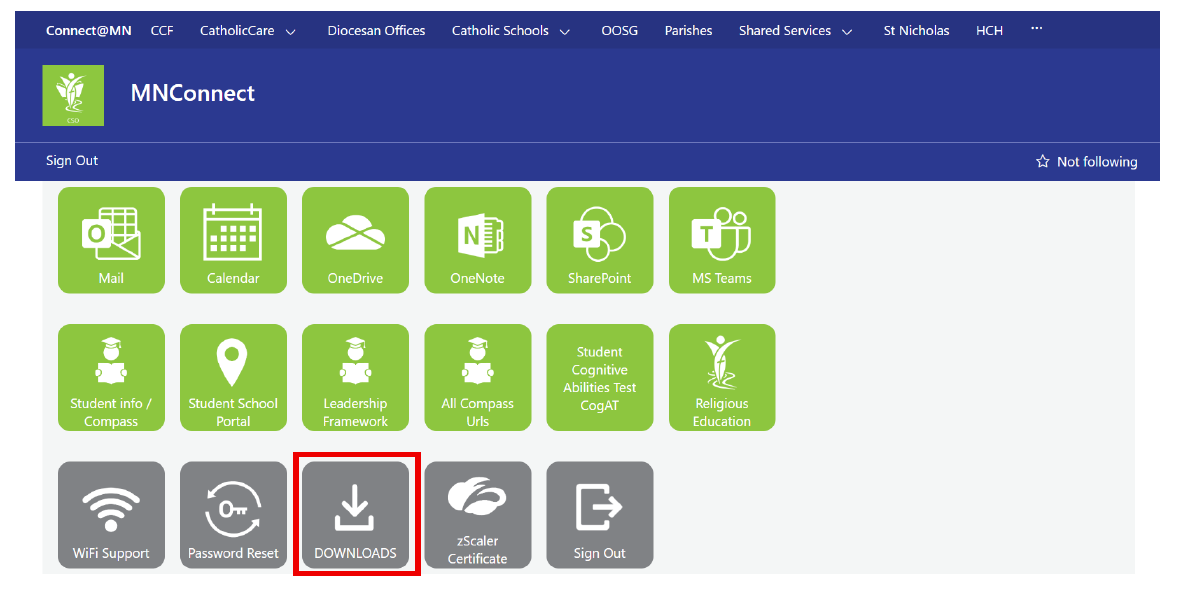
- From the ‘MNConnect’ page, click the ‘Downloads’ icon. This will open the ‘Downloads for BYOD Devices’ page.
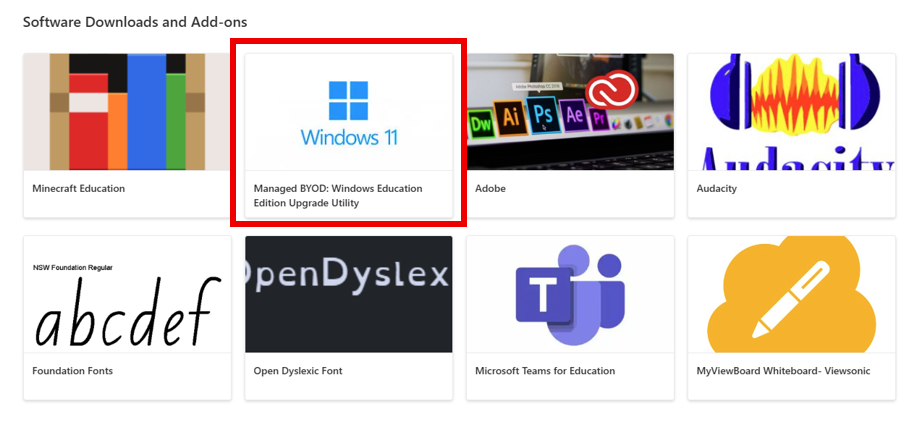
- Scroll down to find the ‘Software Downloads and Add-ons’ section of the page, click on the ‘Managed BYOD: Windows Education Upgrade Utility’ icon. This will initiate a download of the Upgrade Utility.
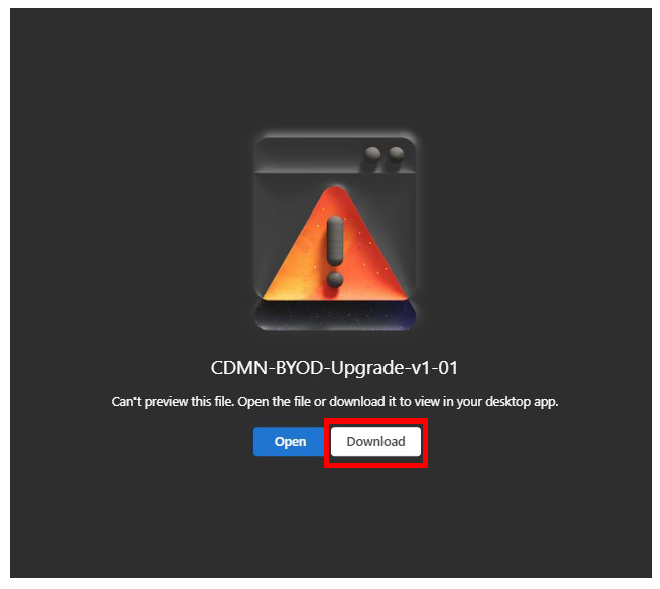
- If the following (or similar) prompt is displayed, simply click ‘Download’ to confirm that you want to download the Upgrade utility.
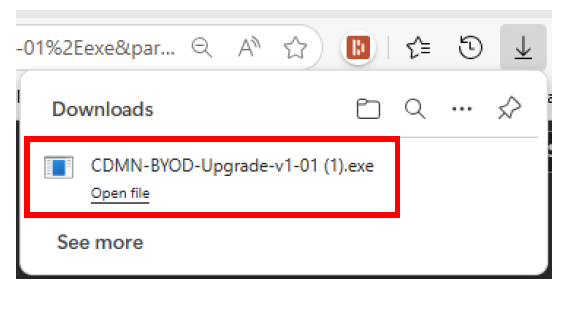
- Click ‘Open File’ from the Downloads prompt or open the location where application file was saved in Windows file explorer (this will most likely be the ‘Downloads’ folder). Locate ‘CDMN-BYOD-Upgrade-vx-xx.exe’ and double-click it to launch the application.
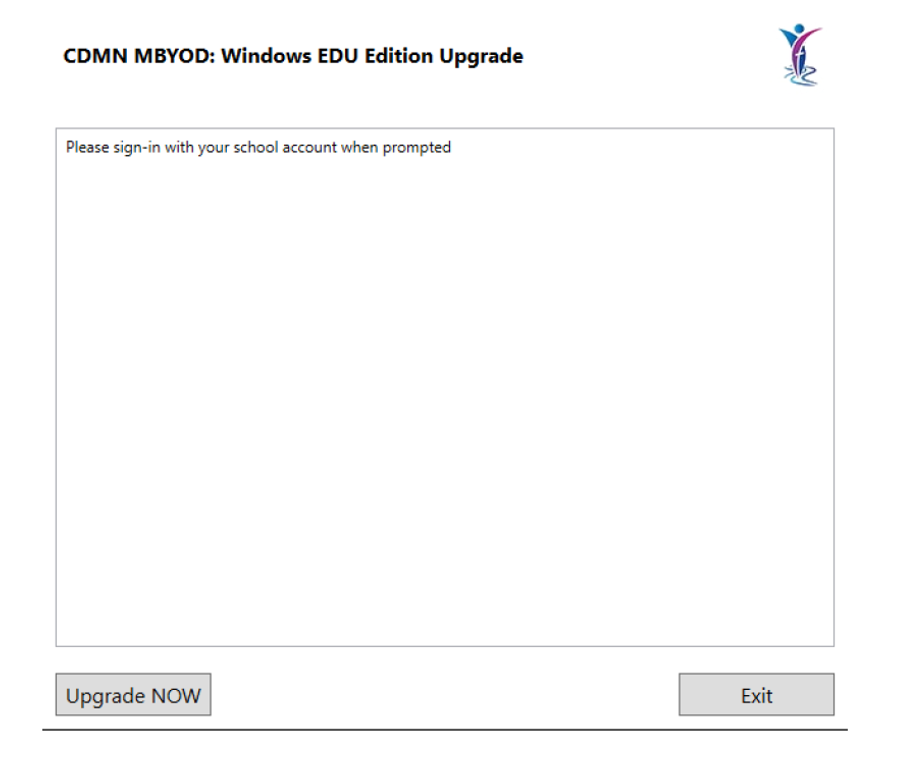
- Initially, the following window will appear.
Note: Do not click anything yet. Wait for the second pop up window to appear as shown in Step 20.
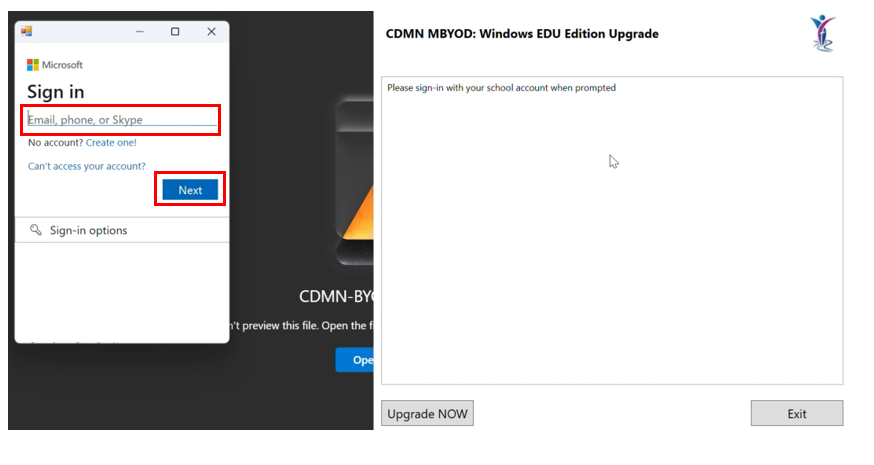
- After this window opens you will get a pop-up box asking you to sign in with your Microsoft account. At this point you must enter the student’s full school email address (firstname.lastname@mnstu.catholic.edu.au) then click ‘Next’.
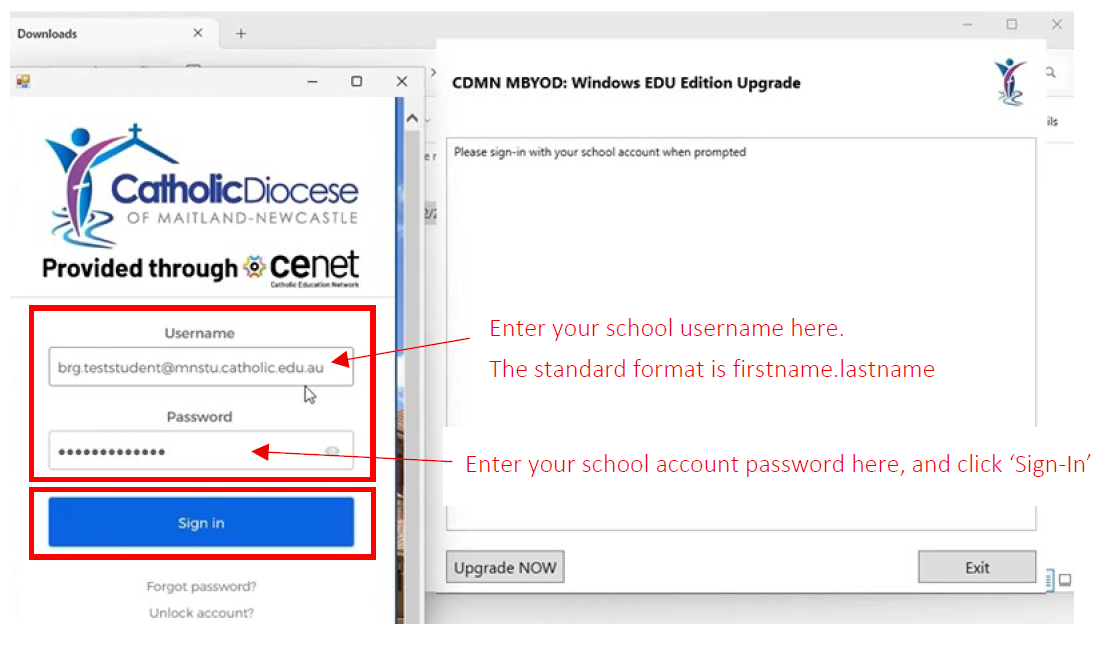
- The application will then prompt you to sign into your school account. Enter your school username and password as shown below, then click ‘Sign in’.
- The application will then verify your account and retrieve the upgrade key.
A message will be displayed in the application window when ready.
Click the ‘Upgrade NOW’ button to continue.
The upgrade process will restart your device to complete.
Note: The verification process allows each student to upgrade one device. If you need to upgrade multiple devices or if there is an issue with verification, please contact your school technology support person.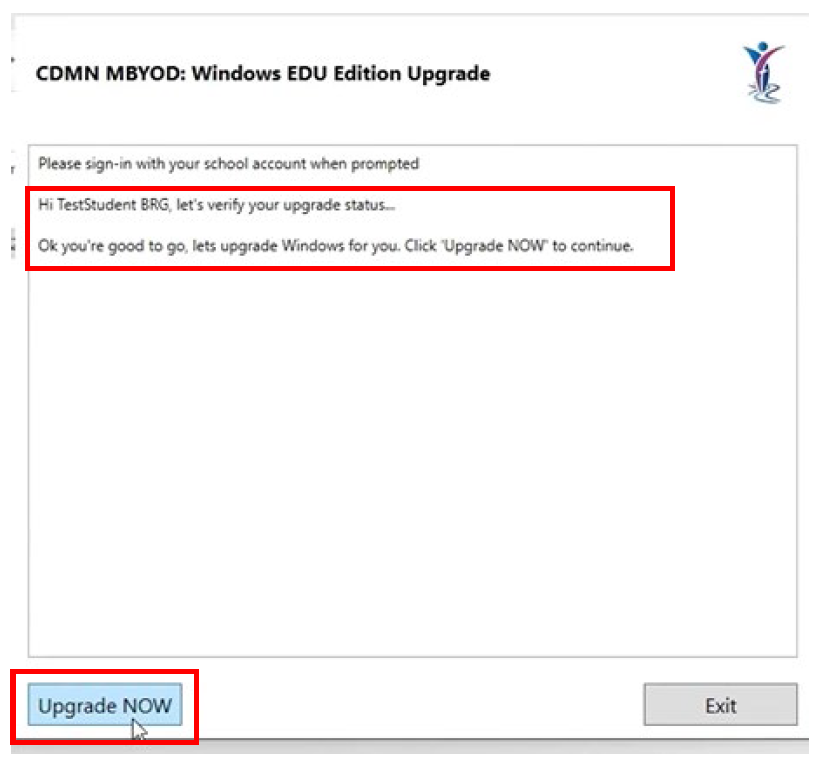
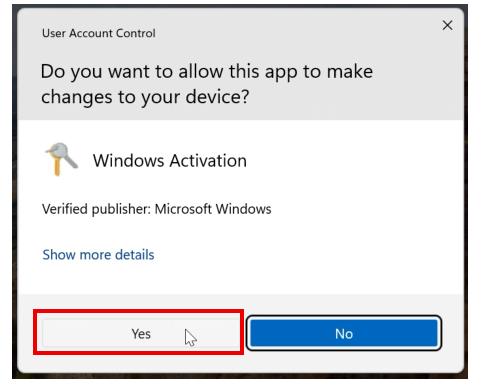
- You may now see the following pop up on screen asking for permission to make changes to your device. If you see this click ‘Yes’ to continue.
Once the upgrade process begins, progress will be displayed as shown below: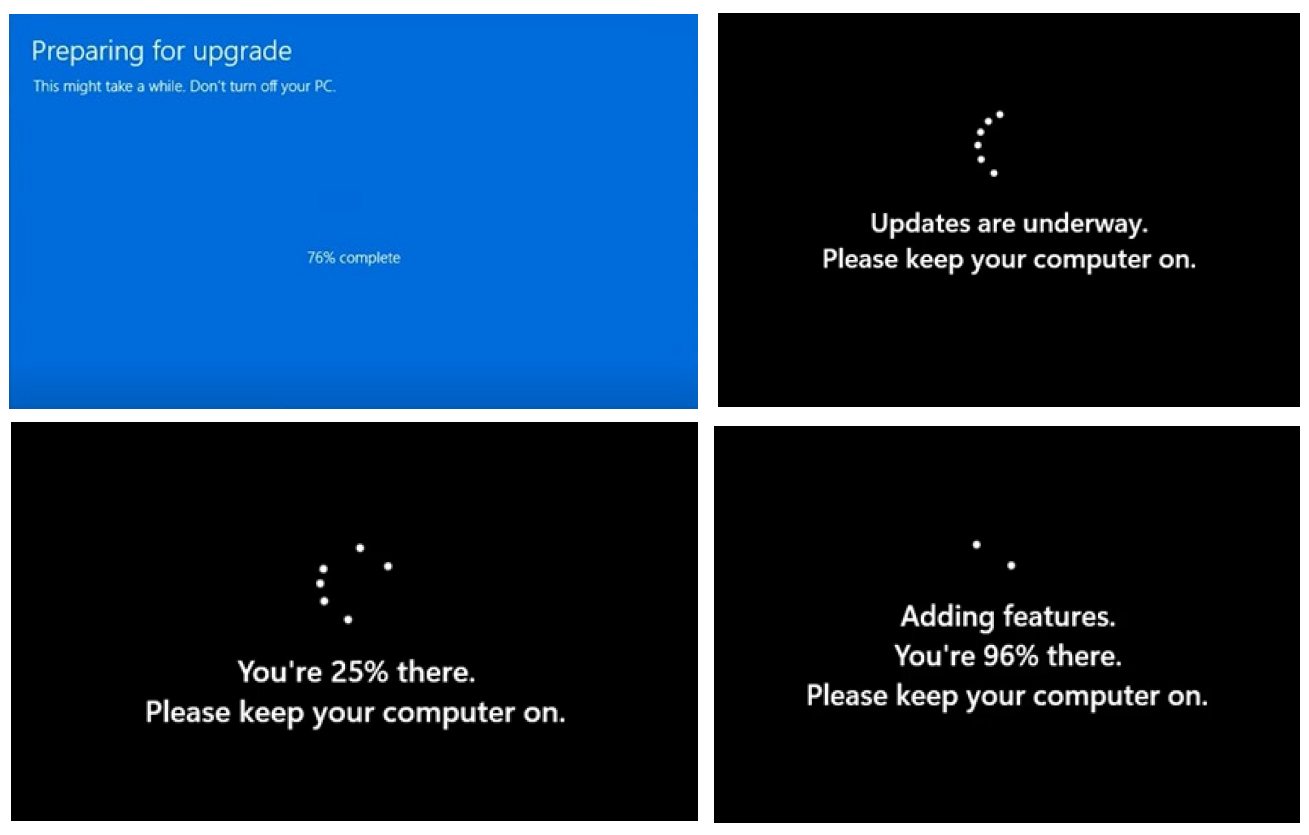
- When the upgrade process is complete and the device has restarted, you will be prompted to log on. Sign on to the device with the personal Microsoft account you have just been using as normal.
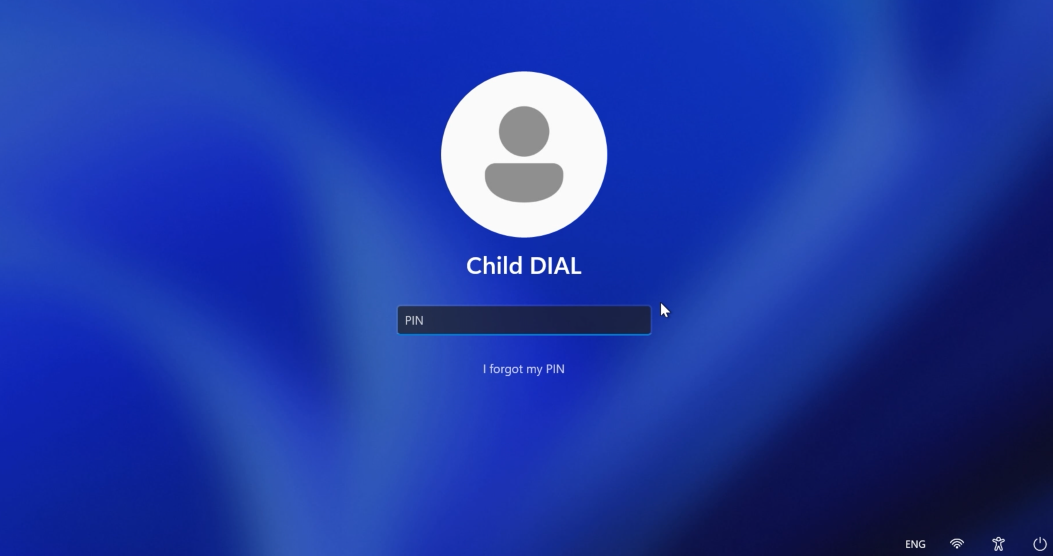
- Once logged on, a message should appear to confirm the success of the upgrade process (shown below). Click on the message box to open the relevant settings page.
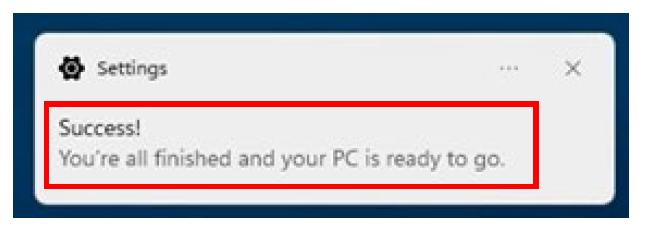
This will display the Windows Edition and the activation state.
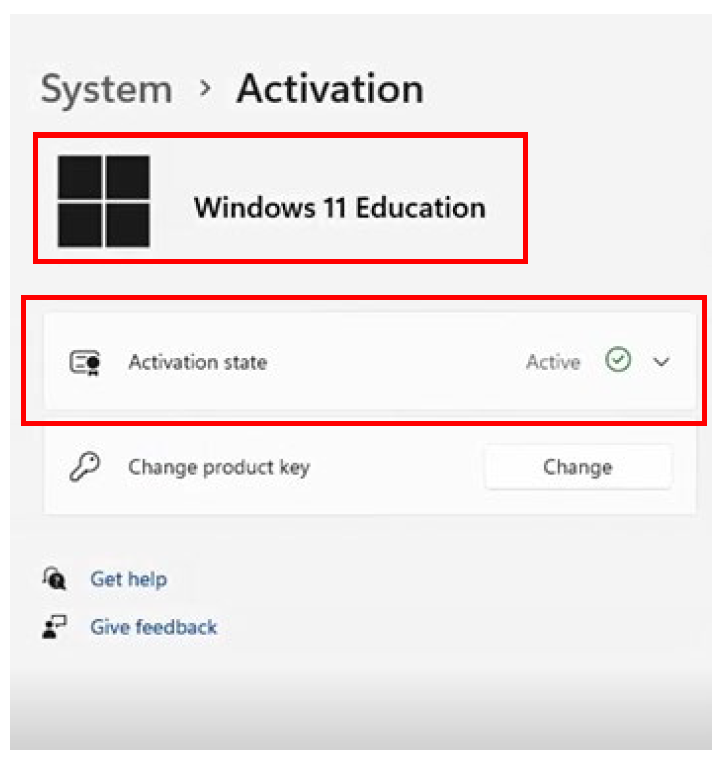
Note: If the above activation window does not appear after clicking on the ‘Success!’ pop up, or the success pop up does not appear after signing back in to your device, it is also possible to verify the Windows Edition and activation state by clicking on the ‘Windows start button’ and opening the ‘Settings Menu’. Then from the ‘System’ listing, click ‘Activation’ and you will see the above window. - At this point, the Windows Edition upgrade process is complete, and your device is now running Windows Education edition. It is now ready, to be enrolled in CDMN’s device management platform. Continue with the next steps to ensure the device is enrolled in the managed program correctly.Enrolling the Windows Education device into the Managed BYOD platform
- Ensure you are still logged in to the device as normal with the personal Microsoft account you have been using that has administrator permissions.
- Click the ‘Start’ button, then click ‘Settings’
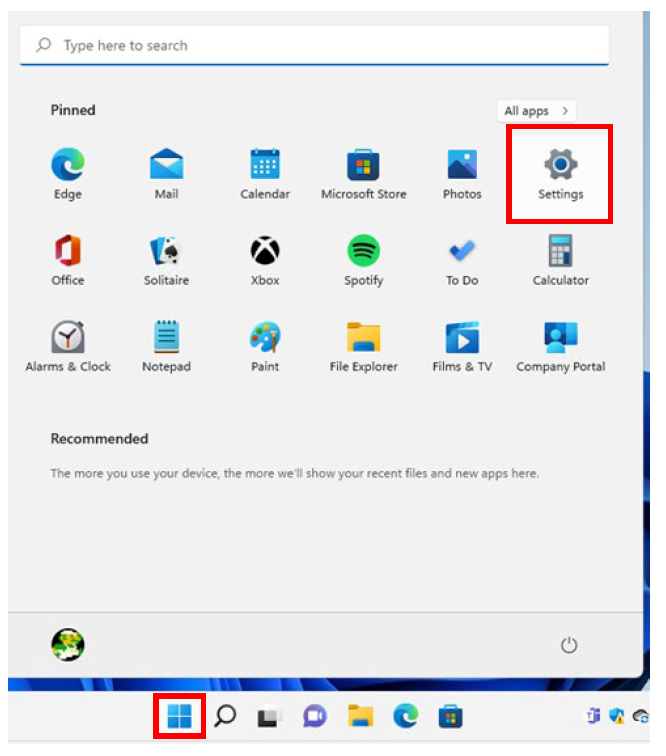
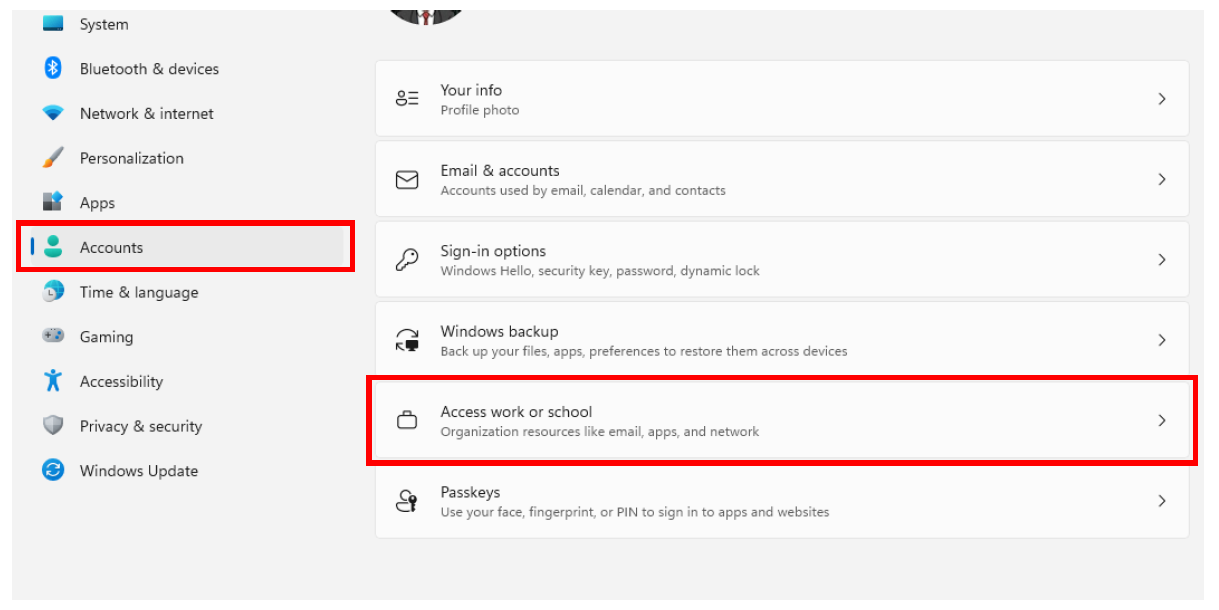
- When the ‘Settings’ window opens, click on ‘Accounts’ and then ‘Access Work or School’.
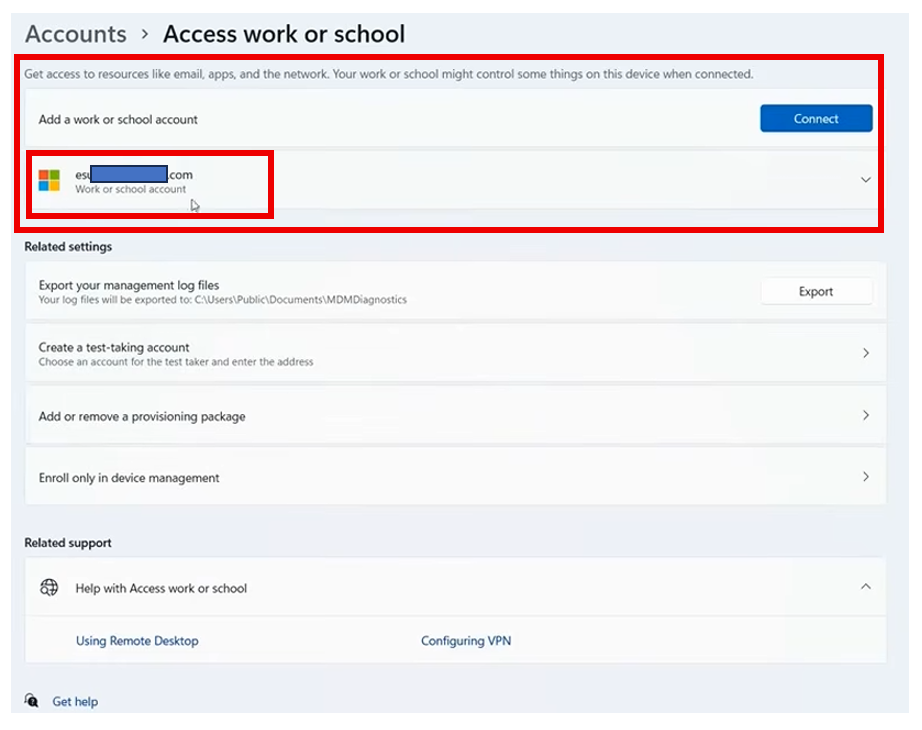
- You will now see the following box which may show that one or more work / school accounts is already connected. You must disconnect these accounts before proceeding. If you do not see any accounts listed, under add a work or school account, you can go straight to Step 33.
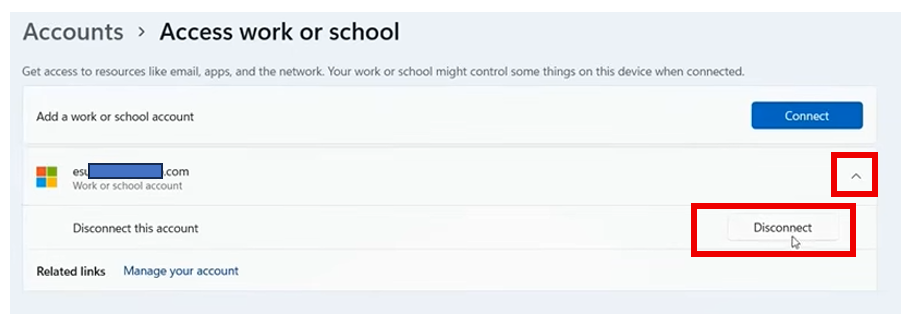
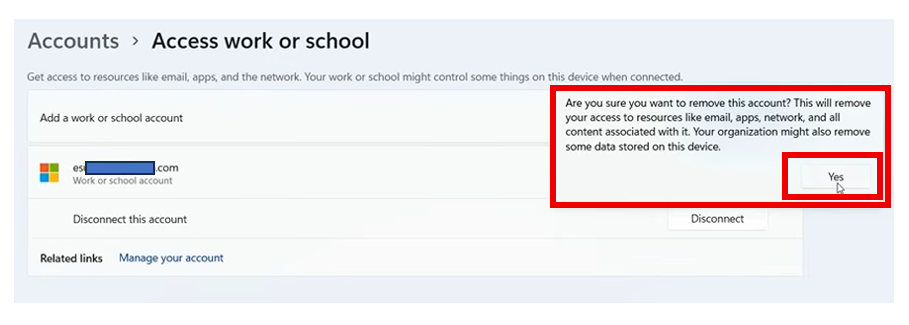
- Select the drop down icon beside the account. Then select the ‘Disconnect’ button.
- You will then see a pop asking you to confirm that you want to remove the account. Click ‘Yes’.
Note: You will need to repeat these steps for any additional work or school accounts showing on the device before proceeding.
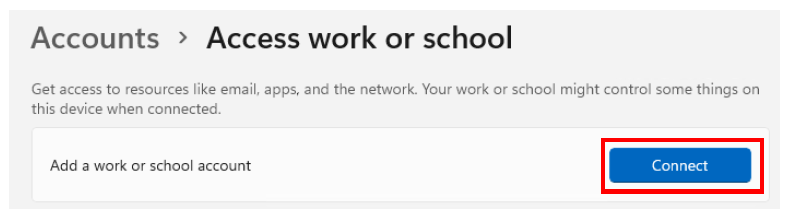
- You should now see the following screen that shows no accounts currently connected. Click the ‘Connect’ button.
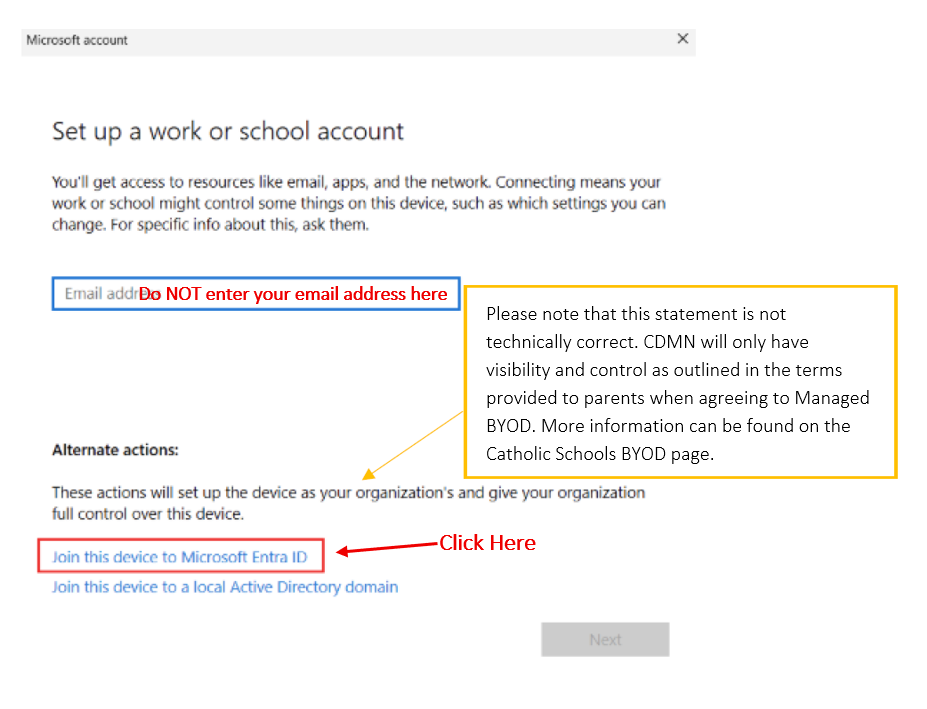
- The following window will then open. Click the ‘Join this device to Microsoft Entra ID’ link.
Note: If this option does not appear it is usually because you are not connected to the internet or the account you are using does not have administrator privileges.
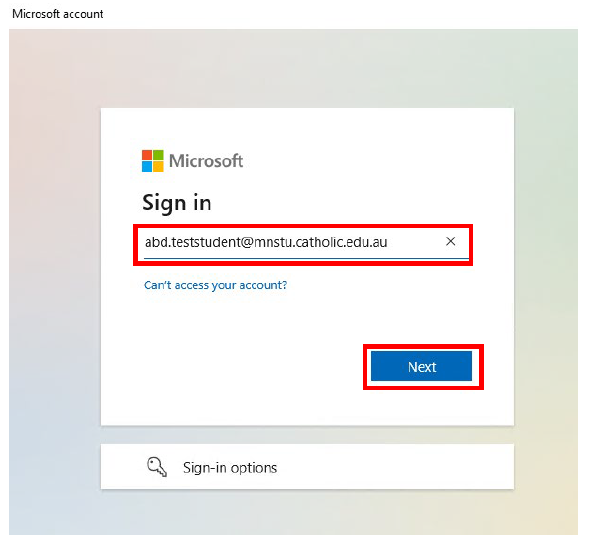
- You will then be prompted to ‘Sign in’. On the screen that appears, enter your full student school e-mail address (ie firstname.lastname@mnstu.catholic.edu.au) and click ‘Next’.
- When the standard CDMN (CeNET) logon prompt appears, enter your school details as shown.
Note: The username format here is simply firstname.lastname.
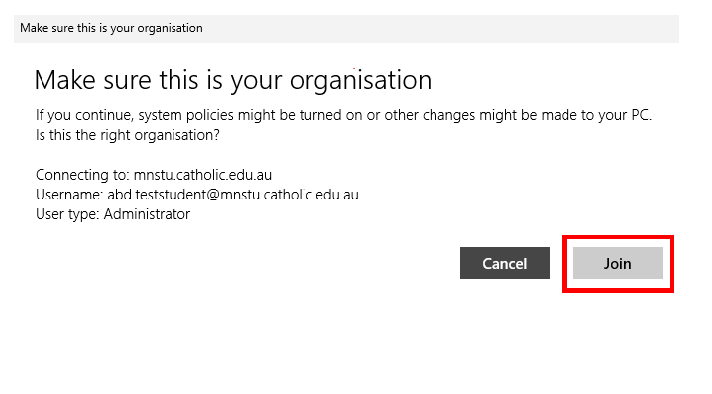
- You will now see the following screen, click ‘Join’ to confirm and complete the process of enrolling your device.
- Once enrolment is complete, the following confirmation screen will be displayed. Simply click ‘Done’.
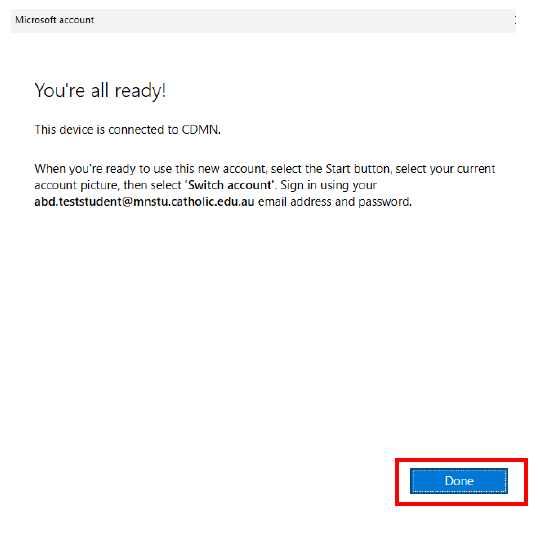
- You will now need to restart your device (or ‘Switch Accounts’ as explained in the previous pop up above) before you can sign into your device with your school account.
Note: Before switching to your school account, consider transferring any files or data you want to access via your school account to your school OneDrive. Your school OneDrive can be accessed via https://mncatholic-my.sharepoint.com/ Click the Windows Start icon, then the power button icon, and select ‘Restart’.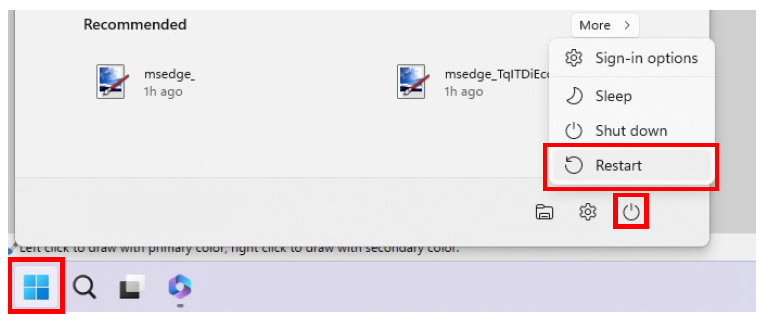
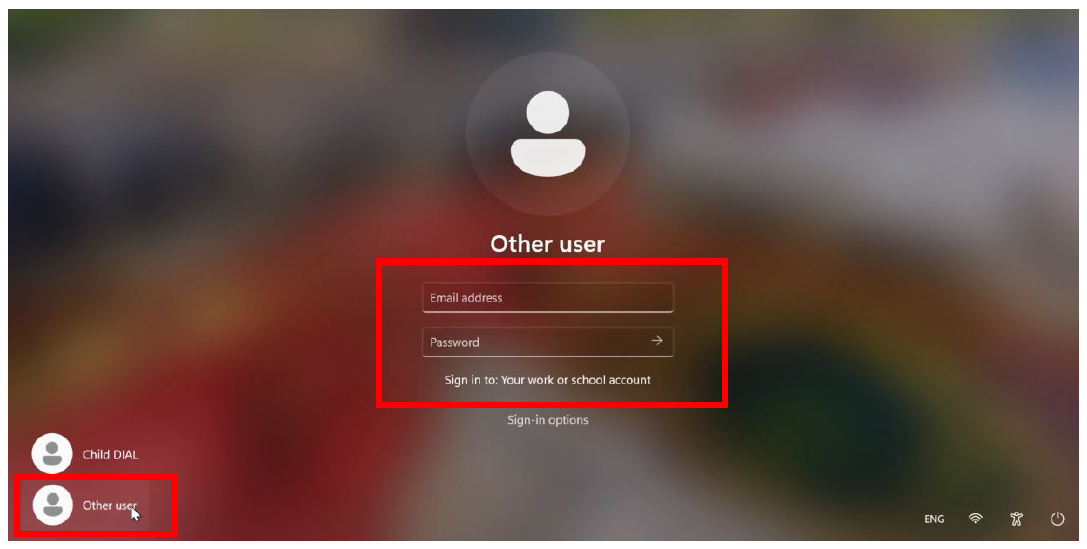
- When the device restarts, select ‘Other user’ from the bottom left icons and then enter your full school e-mail address and password in the other user fields. Then press enter or click the arrow icon beside your password to log in.
- Once logged in with your school account, the process to enrol your device is complete. Relevant applications and device profiles will be installed as required. Additional apps may be made available for installation in the ‘Company Portal’. In most cases it will appear in the list of ‘Recommended’ applications. If this not the case, then click ‘All apps’ and select it from the list of installed applications. It may take a few minutes for the Company Portal to be deployed to your device after the initial setup is complete.
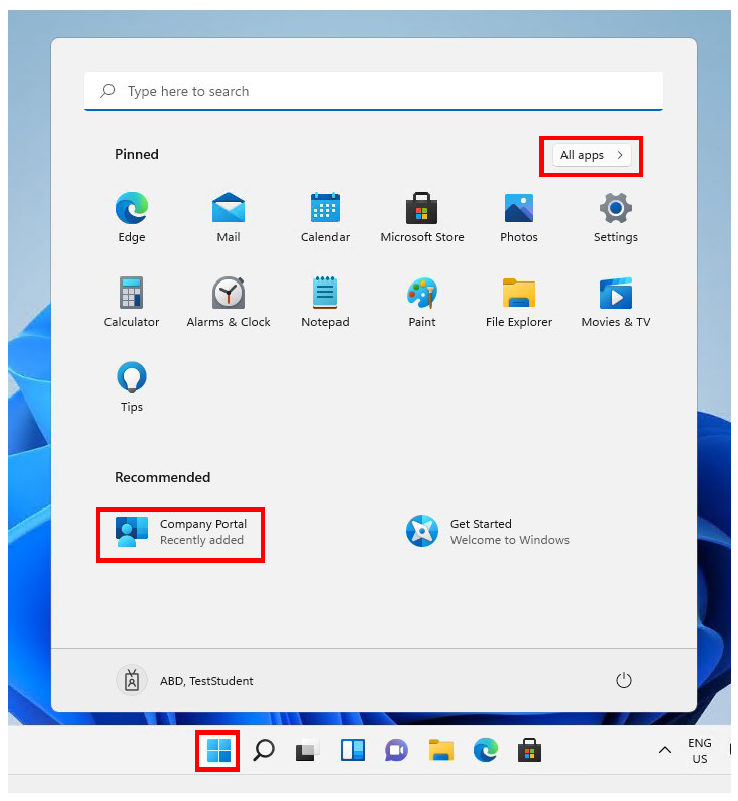
- You should now be able to see all apps available to you at your school in the Company Portal. Some applications will be automatically deployed to your device, as defined by your school.
- Your student BYOD device is now completely setup and ready to use on the school network.
- When you take your device into school you will select the wifi network called “CSMN” to connect to the school wifi.
- Great job, you’re all set! Thank you for taking the time to work through each step. Your device is now ready for learning. Your school and teachers will provide any other specific information on how you will use your device in the classroom. If you have any other questions please have a look at the FAQ section on our BYOD page here.