BYOD Unenrolment
Windows 11 Managed Devices
The following guide will step you through how to unenrol a Windows 11 device from the Managed BYOD platform.
IMPORTANT: Only follow this guide if you intend to unenrol your Managed BYOD from the management platform used by the diocese. This is usually only done when you are no longer attending one of our diocesan schools. The following guide is aimed at parents and students who wish to unenrol their device so that it will no longer be part of the schools Managed BYOD. Removing your device from CDMN’s device management platform will remove your school user account (i.e. firstname.lastname@mnstu.catholic.edu.au), managed applications and associated data.
If you are unsure whether you should do this, please confirm with your school prior to proceeding.
Before you begin, please ensure you have the following:
- Your Managed BYOD running Windows 11. If your Managed BYOD is running Windows 10, click here to use these instructions.
- A stable internet connection.
- Fully charged device and connection to power.
- An active student account (firstname.lastname@mnstu.catholic.edu.au).
- Student’s school password
- Note: This must be the student account that is used to sign into the enrolled device.
Unenrolling a Windows 11 Managed Device
Follow the instructions below to unenrol your Managed BYOD Windows 11 device. You can also download a copy of the instructions here.
- Before beginning this process, please ensure that you have backed up or transferred any files or data that you wish to retain from the computer on to a personal USB drive or personal cloud storage location.
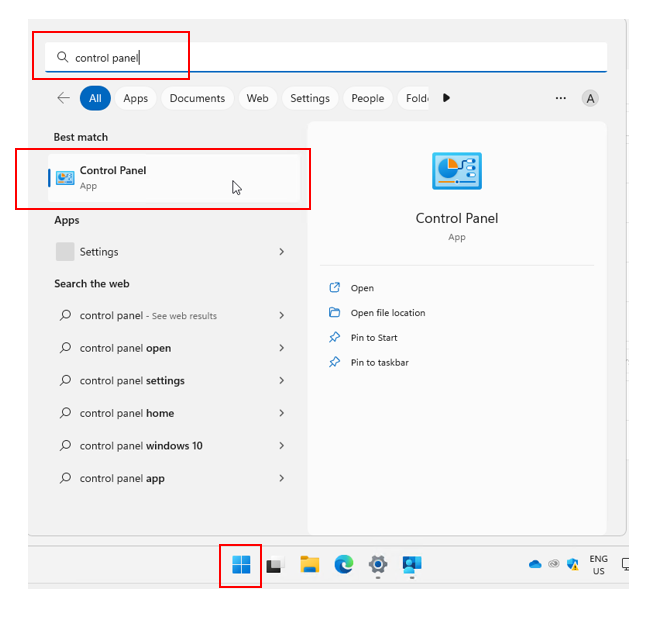
Once you complete the unenrolment process you will no longer have access to your school account on the device or any associated files stored on this device using that account. - Sign into your managed device with your student details like normal then click the ‘start’ button, and type ‘Control Panel’.
Search results will appear as shown.
Click the ‘Control Panel’ icon.
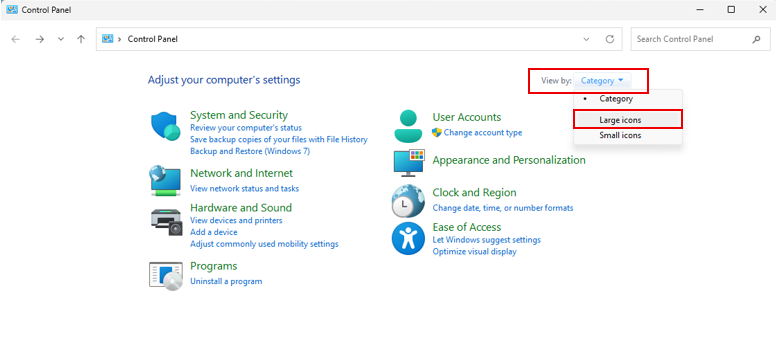
- When the ‘Control Panel’ window opens select ‘Large Icons’ from the ‘View By’ drop-down list.
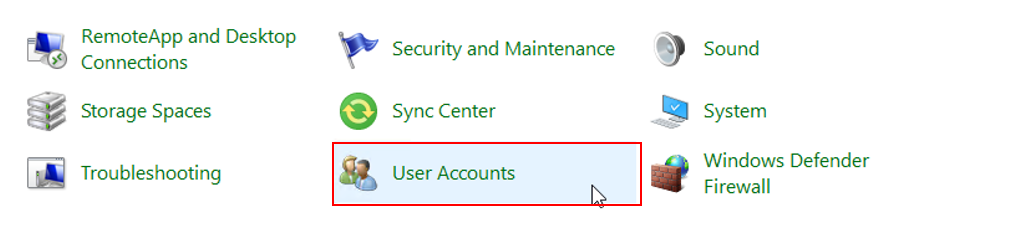
- On the following view Click ‘User Accounts’.
- Check for the presence of a local account, by clicking on the ‘Manage another account link’, as shown below. This is configured as standard for all devices joined to the management platform.
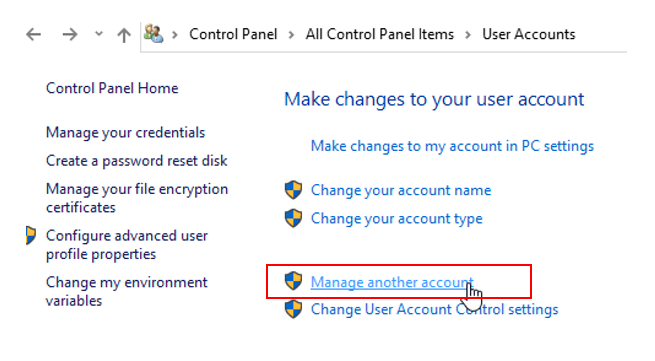
- The local user account will simply be called ‘LocalUser’.
Click on the ‘LocalUser’ account icon.
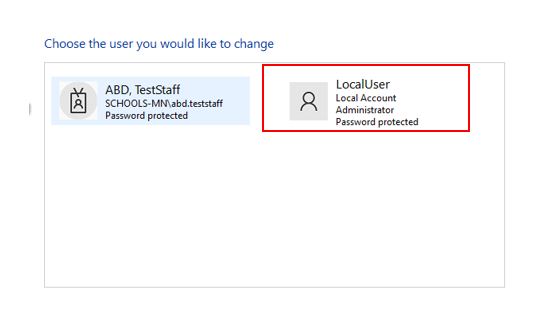 Note: If a local user account does not exist, please see the instructions on how to create one here.
 - Click the ‘Change the Password’ link from the options displayed.
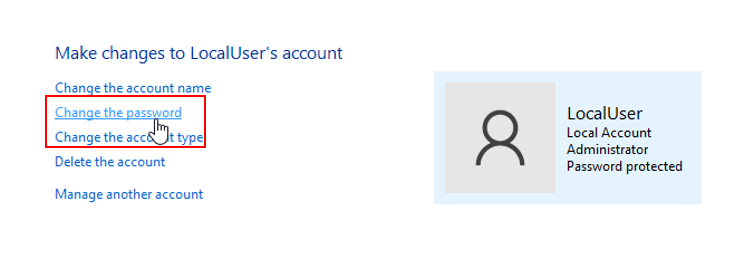
- On the screen shown below enter a new password for the local account in the ‘New password’ box, and again in the ‘Confirm new password’ box. You can also add a hint, however this is optional.
Be sure to remember the password as this account will be the only way to access your device once it has been removed from the management platform. When satisfied, click ‘Change Password’
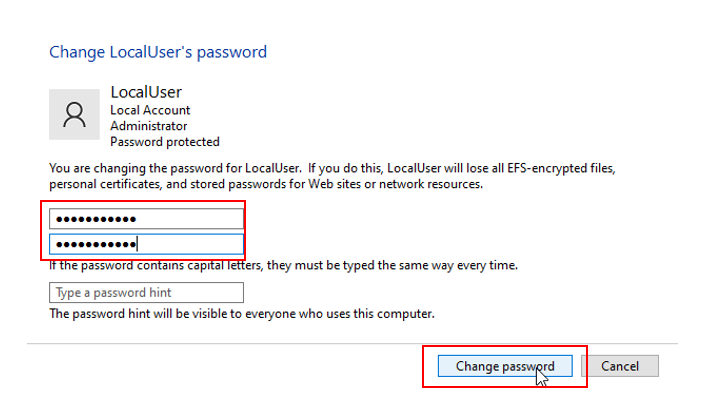
- You will then be returned to the main Account Management screen.
You can now close the Account Management window and continue with the next steps. - Now click on the Start Menu icon, and then click ‘Settings’.
Note: if the settings icon does not appear it may be necessary to click on ‘All apps’ and select it from the list.
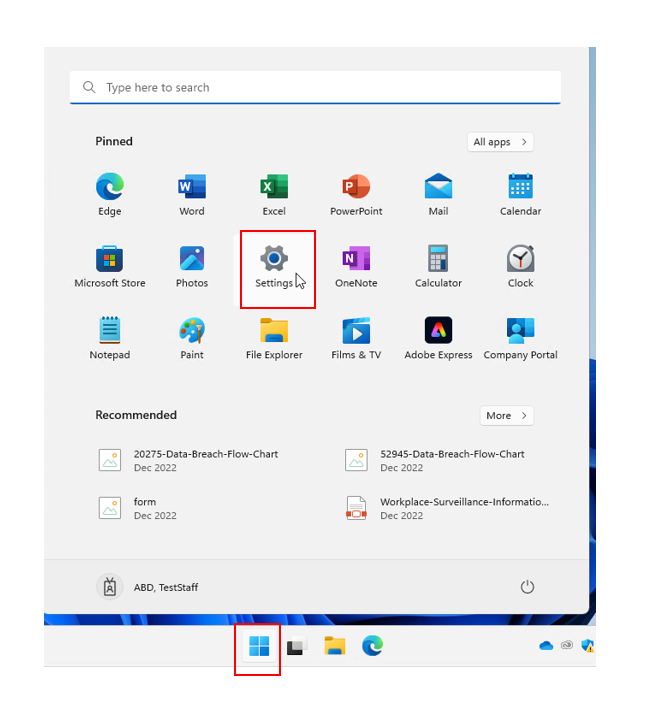
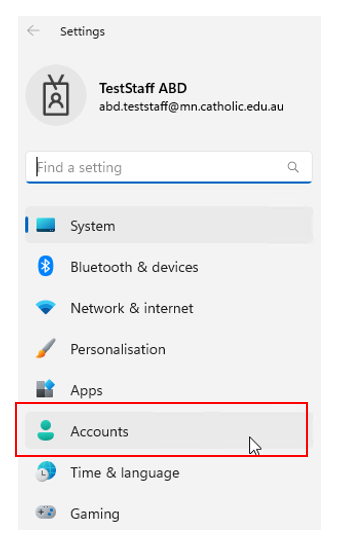
- In the settings menu click on the ‘Accounts’ option from the list presented on the left.
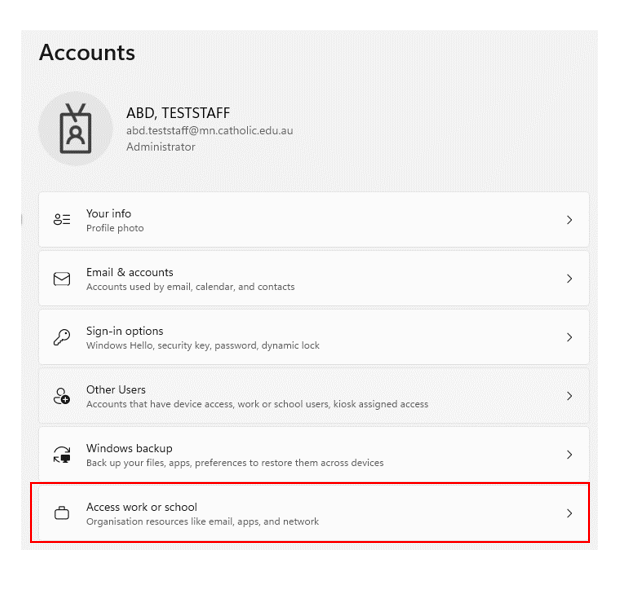
- Then click ‘Access Work or School’.
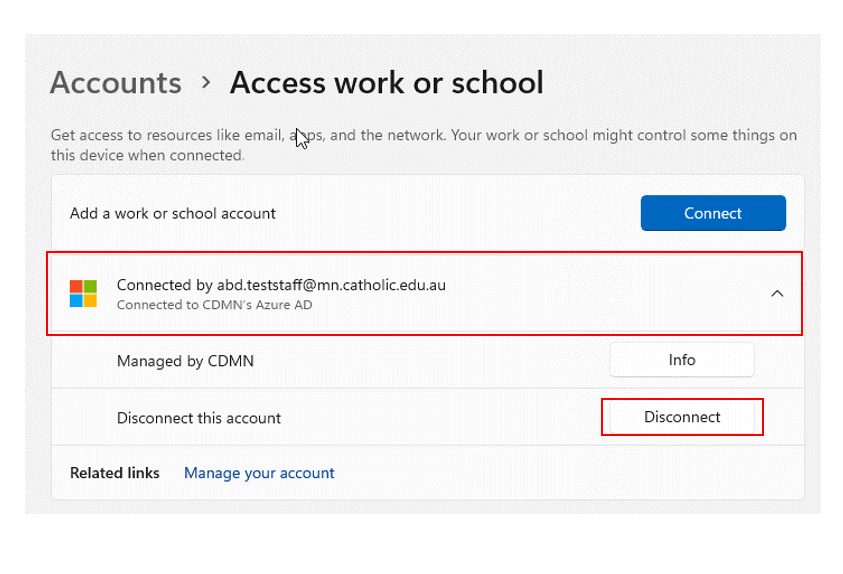
- The following screen, shown below, will then be displayed.
Click on the item listed as ‘Connected to CDMN’s Entra ID’.
Then click ‘Disconnect’.
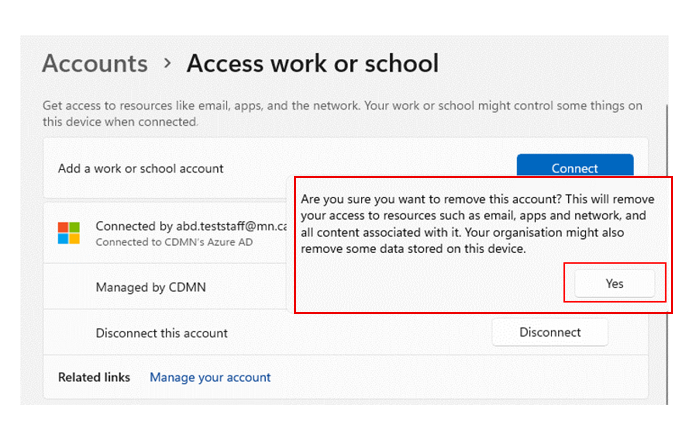
- The following warning will then be displayed.
If you are satisfied that you have retrieved any required data from the device, click ‘Yes’ to proceed.
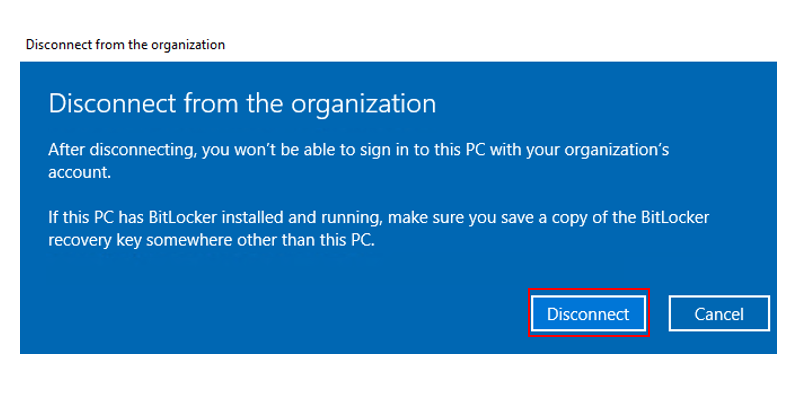
- A second confirmation will then be displayed as shown below.
Click ‘Disconnect’.
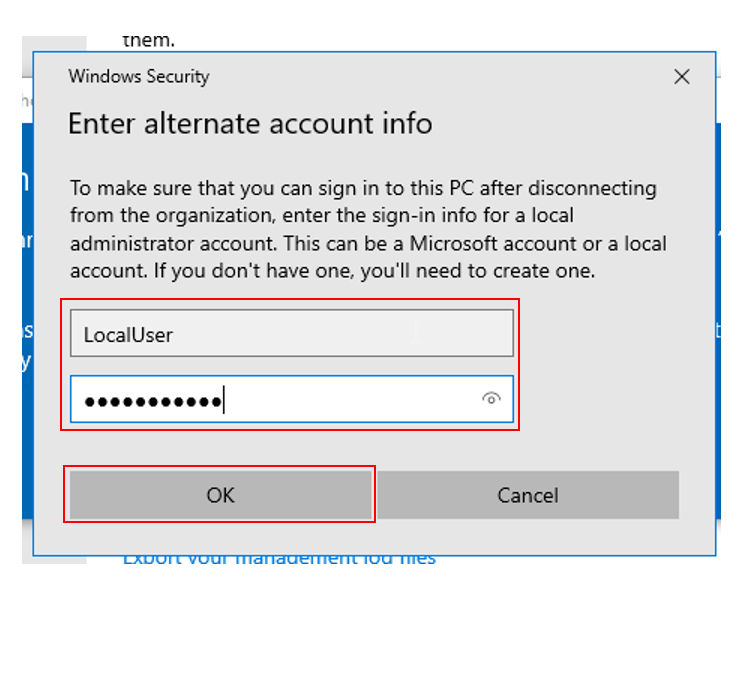
- When prompted, enter the details of the ‘LocalUser’ account, that was configured earlier.
Then click ‘OK’.
The process of unenrolling your device from the CDMN management platform will take a minute or two to complete.
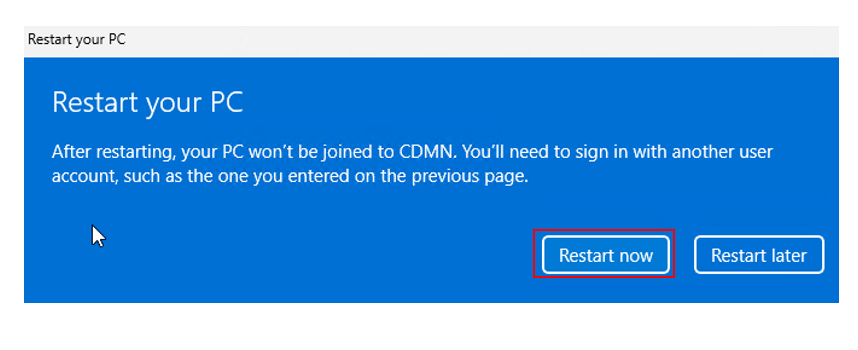
- Once the process is complete you will be prompted to ‘Restart your PC’.
Click ‘Restart now’ when prompted.
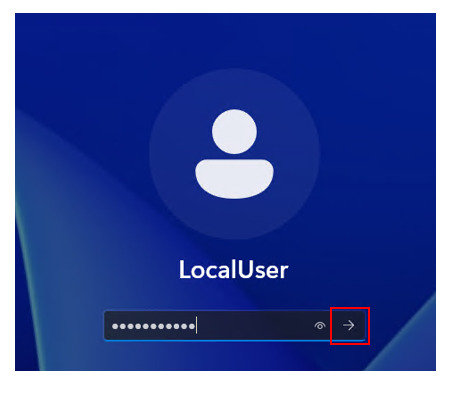
- When the device restarts, you’ll be prompted to login with the ‘LocalUser’ account.
To login simply enter the password you created earlier in this process for the ‘LocalUser’ account and press ‘Enter’ or click on the arrow icon.
Note: Some users may see a different account sign in option other than ‘LocalUser’ if they have previously created a different local account or personal account on the device. If so, use those details to sign in to your device now.
 Your device has now been completely unenrolled form the Managed BYOD platform.
At this point you will no longer be able to sign in using your school account on this device.The LocalUser account has full access and administrator privileges to the device.
You can configure and use this account as needed.